Master Crispy Chicken Cutlets: Golden, Juicy & Easy
In the bustling world of home cooking, certain dishes stand as foundational pillars – essential skills that elevate your culinary repertoire and guarantee delicious, crowd-pleasing meals. Among these, mastering homemade
crispy breaded chicken cutlets reigns supreme. Forget the often-disappointing, lukewarm, and frankly expensive store-bought versions. Learning to craft these golden, crunchy, and irresistibly juicy delights yourself is not only economical but also unlocks a world of flavor and versatility that every home cook deserves. From quick weeknight dinners to sophisticated weekend spreads, perfectly cooked chicken cutlets are an absolute game-changer.
Why dedicate your kitchen time to this classic? Beyond the obvious superior taste and texture, homemade cutlets offer unparalleled freshness and control over your ingredients. They’re a true staple, ready to transform into countless dishes, making them ideal for efficient meal prepping at the start of the week. This guide will walk you through every critical step, ensuring your journey to perfect
crispy breaded chicken cutlets is both simple and rewarding.
The Foundation: Preparing Your Chicken for Perfection
The secret to quick-cooking, evenly crisped chicken cutlets begins long before they hit the pan. Proper preparation of the chicken itself is paramount.
Slicing Chicken Breasts into Cutlets
If you’re starting with pre-cut chicken cutlets, you’re already one step ahead! However, if you have whole chicken breasts, transforming them into uniform cutlets is straightforward and allows for greater control over thickness.
*
Positioning: Place a chicken breast flat on a sturdy cutting board.
*
Hand Placement: Gently but firmly place your non-dominant hand flat on top of the breast, holding it steady.
*
Horizontal Slice: Using a very sharp knife, carefully slice the breast horizontally through its center. Aim to keep your knife parallel to the cutting board, making long, steady strokes to guide it through. The goal is to create two thinner, relatively even pieces. Repeat for all breasts.
Pounding for Evenness and Tenderness
Once sliced, the next crucial step is pounding the chicken. This isn't just about achieving your desired thickness; it also tenderizes the meat and ensures that each cutlet cooks quickly and evenly, preventing dry spots.
*
Protect and Pound: Place each chicken piece between two sheets of plastic wrap or inside a large freezer bag. This keeps your workspace clean and prevents the chicken from tearing.
*
The Right Tool: A meat mallet is ideal for this task. If you don't have one, don't fret! A heavy, flat-bottomed pan, a small saucepan, or even a sturdy wine bottle can work wonders.
*
Even Pressure: Gently but firmly pound the cutlet until it’s about half its original thickness, or thinner if you prefer a super-delicate texture. Focus on pounding evenly across the entire surface to avoid thin spots that might overcook and dry out. Aim for a consistent thickness, typically around ¼ to ½ inch.
The Art of the Golden Crunch: Breading Techniques
The hallmark of a great chicken cutlet is its perfectly golden, shatteringly crisp coating. Achieving this isn't magic; it's all about technique, starting with a well-organized breading station and a few key tips.
Setting Up Your Breading Station
An efficient assembly line prevents mess and ensures every cutlet is uniformly coated. You’ll need three shallow dishes or plates:
1.
Flour Dredge: All-purpose flour seasoned generously with salt, black pepper, garlic powder, and a pinch of paprika for color. This first layer helps the egg adhere.
2.
Egg Wash: Beaten eggs (2-3, depending on the number of cutlets) with a splash of milk or water. This acts as the "glue."
3.
Breadcrumbs: The star of the show. While regular breadcrumbs work, Panko breadcrumbs are highly recommended for their superior crunch and airy texture. Season your Panko with salt, pepper, Italian seasoning, and grated Parmesan cheese for an extra layer of flavor.
The Breading Process: Ensuring the Coating Sticks
*
Flour First: Dredge each cutlet thoroughly in the seasoned flour, shaking off any excess. Every surface should be lightly dusted.
*
Egg Dip: Next, immerse the floured cutlet completely in the egg wash, ensuring it’s fully coated. Let any excess egg drip off.
*
Panko Press: Finally, transfer the cutlet to the seasoned Panko breadcrumbs. Press firmly on both sides to ensure the breadcrumbs adhere well. Don't be shy – really press them on! The more firmly they're pressed, the better they'll stick during frying.
*
The "Dry Hand/Wet Hand" Method: To keep your hands clean and avoid clumpy breading, designate one hand as your "dry hand" for flour and breadcrumbs, and the other as your "wet hand" for the egg wash.
*
Pre-Breading Advantage: Yes, we are going to bread all the cutlets *before* you even turn on the stove. This is a game-changer! No one wants to juggle breading and frying simultaneously. Pre-breading allows for a smooth, stress-free frying process and can even help the coating set slightly, leading to a better crisp.
Sautéing to Golden Perfection: Achieving that Signature Crisp
With your cutlets perfectly prepped and breaded, it’s time for the moment of truth: the sauté. The key to achieving that restaurant-style golden crust and juicy interior lies in the right oil, temperature, and technique.
*
Oil Selection: Choose a neutral-flavored oil with a high smoke point, such as canola, vegetable, or grapeseed oil. You'll need enough oil to generously coat the bottom of your pan, about ¼ to ½ inch deep.
*
Temperature is Key: Heat the oil in a large skillet over medium-high heat. The ideal temperature is crucial – too low, and the cutlets will absorb too much oil and become greasy; too high, and they'll burn before cooking through. You can test the oil by dropping a small pinch of Panko in; it should sizzle and turn golden within 10-15 seconds.
*
Don't Overcrowd: Cook the cutlets in batches, ensuring there's enough space between each piece. Overcrowding the pan will drop the oil temperature, leading to soggy rather than crispy cutlets.
*
Sautéing Time: Cook for 3-5 minutes per side, or until deeply golden brown and cooked through. The exact time will depend on the thickness of your cutlets. A good indicator of doneness is when the internal temperature reaches 165°F (74°C).
*
The Wire Rack Secret: As each batch finishes cooking, transfer the cutlets to a wire rack set over a baking sheet. This allows air to circulate around them, preventing the bottom from steaming and losing its precious crispness. Avoid stacking them or placing them directly on paper towels for too long.
Beyond the Pan: Serving Suggestions and Versatility
The beauty of
crispy breaded chicken cutlets lies not just in their incredible taste, but also in their boundless versatility. They are truly a canvas for culinary creativity, adapting to almost any mealtime need.
*
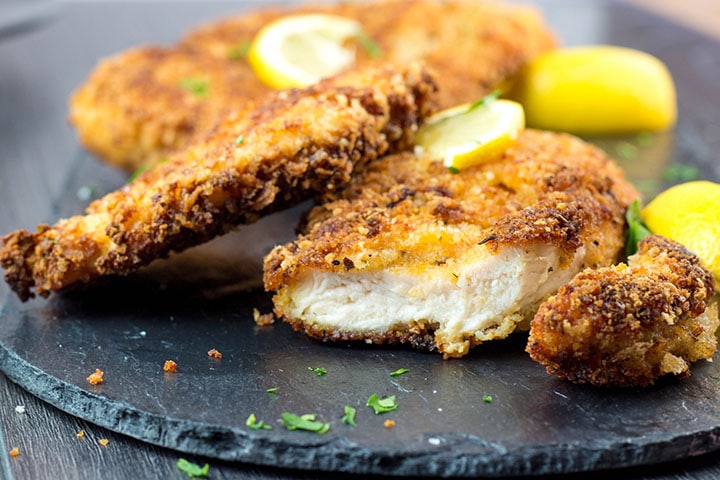
Classic Simplicity: Serve them hot with a squeeze of fresh lemon, a side of roasted vegetables, or a light salad for an elegant yet easy meal.
*
Family Favorites: Their undeniable kid-friendly appeal makes them a go-to. Think of them as giant, gourmet chicken nuggets! Pair them with macaroni and cheese, mashed potatoes, or even serve them alongside dipping sauces like honey mustard or ketchup.
*
Italian Inspirations: Transform them into a show-stopping Chicken Parmesan by layering with marinara sauce and mozzarella cheese, then baking until bubbly. They also make fantastic additions to pasta dishes.
*
Sandwich Sensations: Stack them on a crusty roll with your favorite toppings – lettuce, tomato, pickles, and a smear of mayo or spicy aioli – for an epic chicken sandwich.
*
Global Flavors: Adapt the seasoning to suit different cuisines. Think a dusting of curry powder for an Indian-inspired twist, or a pinch of chili powder for Mexican flair.
For those focused on smart meal planning,
Crispy Chicken Cutlets: The Versatile Meal Prep Staple provides excellent ideas for batch cooking and storage. Cooked cutlets can be refrigerated for up to 3-4 days and reheated in an oven or air fryer to restore their crispness, making them perfect for quick lunches or dinners throughout the week.
Meal Prep Mastery and Storage Tips
Embracing
crispy breaded chicken cutlets as a meal prep hero is one of the smartest decisions you can make in the kitchen. Their ability to be prepared ahead of time saves precious minutes on busy weeknights and guarantees delicious, homemade meals are always within reach.
*
Pre-Breading for Later Frying: If you want to get a head start, you can bread the cutlets ahead of time and store them in the refrigerator for up to 24 hours. Arrange them in a single layer on a baking sheet lined with parchment paper, ensuring they don't touch, then cover loosely with plastic wrap. This is particularly useful when entertaining or preparing for a large family meal.
*
Freezing Battered Cutlets: For longer storage, flash freeze the breaded cutlets on a baking sheet until solid (about 1-2 hours). Once frozen, transfer them to a freezer-safe bag or airtight container, separating layers with parchment paper. They can be frozen for up to 2-3 months. When ready to cook, fry them directly from frozen, adding a few extra minutes to the cooking time.
*
Storing Cooked Cutlets: Once cooked and cooled completely, store your
crispy breaded chicken cutlets in an airtight container in the refrigerator for up to 3-4 days.
*
Reheating for Optimal Crispness: Avoid the microwave if you want to maintain that golden crunch! The best way to reheat cooked cutlets is in a preheated oven (around 350°F / 175°C) or an air fryer (375°F / 190°C) for 10-15 minutes, or until heated through and re-crisped. This method ensures they retain their delightful texture.
Mastering these preparation and storage techniques will transform your approach to weeknight dinners, making delicious, homemade meals a consistent reality.
Conclusion: Your Journey to Crispy Cutlet Perfection
The journey to crafting perfect
crispy breaded chicken cutlets is a rewarding one, unlocking a culinary skill that offers endless possibilities. From the precise slicing and pounding of the chicken to the art of the breading station and the sizzling sauté, each step contributes to that unforgettable golden, crunchy exterior and succulent, juicy interior. This isn't just a recipe; it's a fundamental technique that empowers you to create delicious, versatile, and economical meals that will impress every palate at your table.
So, roll up your sleeves, gather your ingredients, and embrace the satisfaction of making these ridic-ulicious cutlets from scratch. Your efforts will be repaid with smiles around the dinner table and the confidence of a true home cooking master. For more quick and flavorful ideas, be sure to check out
Minute Crispy Chicken Cutlets: Crunchy & Flavorful. Happy cooking!